How to Create a Multi-column Word Table Where Each Column Has Individual Cell Heights
Word lets you create tables with multiple columns and multiple rows. You can merge two or more cells in adjoining rows in a column if you want. Thereby, you can obtain mixed cell heights across the table. However, you cannot obtain totally independent cell heights in each column this way. The merged cells will always be related to rows in the table.
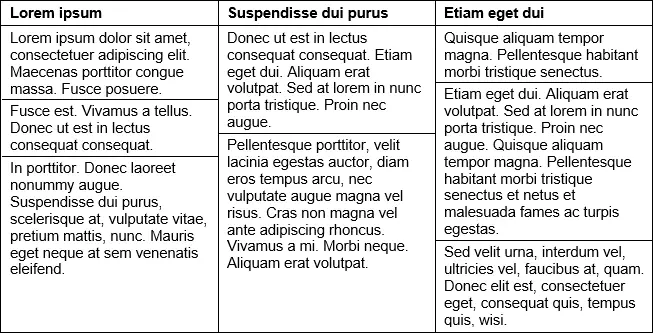
This article provides information about how you can create a multi-column table in Word where each column looks as if it consists of cells with individual cell heights. The idea is to use a special paragraph style to obtain the look you want. See the example in Figure 1 below.
At the end of this article, you will find a download link to a Word document in which I have defined a paragraph styles you can check out or copy as the starting point.

Figure 1. Example of table that looks as if each column has individual cell heights. Read below to learn how you can obtain this result.
How to set up a paragraph style to divide table cells with horizontal borders to create an illusion of separate table cells
As mentioned above, the idea is to use a special paragraph style to obtain the illusion of columns with different cell heights in each column.
Follow the steps below and be careful to follow all details in the instructions:
- Create a table with the desired number of columns and only one row. The row must be allowed to break across pages if the table will span more than one page.
- To have the paragraph borders of the style you are going to create fill the entire cell width, the table must be set up with no left and right cell margins (Table Properties > Table tab > Options > set Left and Right to 0 (zero)).
- Create a paragraph style to be used to create an illusion of separate table cells (or modify an existing style).
In the steps below and in the document you can download, I have named the style Border Between. Use any name you want. - Define the style font, size, etc. as desired (Font dialog box).
- Define left and right indentation (Paragraph dialog box) to the amount the text must be indented in the cell, i.e. this indentation will function as cell margins.
Note that the indents must match the left and right distance from text that will be applied to the horizontal border in the next step. See the paragraph settings in Figure 2 below.

Figure 2. Settings in the Paragraph dialog box. You can apply space before/after if you want more space between the paragraphs. TIP: you can enter a unit of measurement after a number. To set the left and right indent to 6 pt, I typed 6 pt – the unit will be converted to your default unit, here centimeters (result: 0,21 cm).
- To apply a horizontal border to the style so that it appears between adjoining paragraphs with that style and not below, you must first apply the Border Between style to two or more adjoining paragraphs. Otherwise, you do not have access to set a horizontal border between paragraphs. Select the paragraphs before modifying the style. You will now be able to apply a horizontal border to the style (next step).
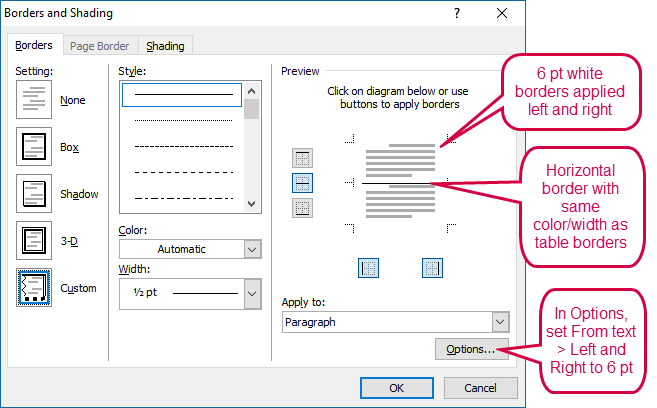
- In the Modify Style dialog box, select Format > Border > Borders tab and apply the following:
6 pt white borders left and right
horizontal border between the paragraphs
same color and width as the table borders
For details, see Figure 3 below.

Figure 3. Borders and Shading dialog box, showing the settings to apply to the paragraph style. Note that if the table is going to have a background shading color, you must use that shading color instead of white for the left and right borders. The purpose of those borders is to add space between the vertical table borders and the text.
- Test the style and adjust the style definition as needed.
You can now use the new style to easily obtain the illusion of separate table cells with individual “cell heights” in the individual table columns. All you need to do is to apply the Border Between style each time you want to add a horizontal border to "split" the cell.
Sample table and more tips
Below is an example of table set up as described above. All paragraphs have been applied the style Border Between. The horizontal border appears as soon as you press Enter. You can study the definition of the Border Between style if you download the Word document below. Read the info in the sample table below too:

Figure 4. Sample table. Read the info in the table for more tips. The info in the table is also found below. You can add a heading row to the table if you want.
If needed, you can create more paragraph styles to use in combination with the Border Between style.
How to get the Word document in which the paragraph style has been set up
Click the link below to download a Word document in which the Border Between style has been set up as described above:
You can study the style definition in the document and use it as the starting point for your own style.


Did you know that...
DocTools Word Add-Ins
can help you save time in Word
On my website wordaddins.com you will find some of the Word Add-Ins I have developed, ready for use:
Generate complete documents in seconds from re-usable text or graphics - read more...
helps you manage comments in Word fast and easy – review comments, extract comments, etc. - read more...
Makes it easier than ever to work with cross-references in Word documents - read more...
Lets you manage document data efficiently with custom document properties and DocProperty fields - read more...
Lets you extract insertions, deletions and comments in full context and including headings - read more..
Lets you apply or remove any highlight color by the click of a button - read more...
Browse pages, headings, tables, graphic, etc. and find text in Word with a single click - read more...
Browse pages, headings, tables, graphic, etc. and find text in Word with a single click - read more...
Lets you quickly and easily create screen tips in Word with up to 2040 characters - read more...


